Firstly, wow, it has been a very long time since the last post and so much has happened. Well, I guess not anything too exciting 'cause we'd have blogged it, right ... right?
The last post was about chickens ... they're gone now. No, we didn't slaughter them, they just got bigger and we couldn't keep them where we are so they went to a good home with a friend of Amy's. We have visited them a few times since, and one of them did make it to dinner - but the others are still going strong. The girls are laying eggs, and very nice indeed they are too.
So, other news? I started a new job last Monday. I'm still doing similar things, just at another place. It does involve commuting to London but after commuting costs I am earning fractionally more each month.
Amy applied for and received Indefinite Leave to Remain a few weeks ago (fast tracked as she's visiting the US this summer). Ashley is in the process of applying for her ILR (slow-track due to no going-away-urgency and as it is cheaper) and we're fully expecting that to be granted.
Oh, and Amy is pregnant (yes, it's mine, not the milkman's) and is due late December.
Sunday, 10 July 2011
One Year Later
Sunday, 4 July 2010
Want a Video?
Yellow chick with red head is George.
Yellow chick with green head is Wednesday.
Yellow Chick with blue head is June.
Brown chick with pink head is Defoe.
Brown chick with blue head is the-chick-with-no-name-yet.
Everyone say 'Thank you' to Stephen now!
Thank you, Stephen!
Wednesday, 21 April 2010
Making a Composting Wormery
Over the past few months Amy has been asking for a composting wormery, suggesting it might be a good birthday present. I decided that rather than wait for her birthday to buy one, I'd make one.
Two weeks ago I purchased all the necessary components, except for the worms, in order to prepare everything with sufficient time so that when the worms arrived the wormery was ready to use. The worms arrived yesterday, and I took photos of the process of assembling the wormery.
Wormery Basics
Research
A composting wormery is, essentially, one or more containers that house composting worms into which suitable kitchen waste can be thrown in order to produce compost. Wormeries generally consist of somewhere for the worms to live, somewhere for food waste to be thrown, and optionally an area to collect liquid by-products.
A wormery can be constructed from sealed stacking boxes, or nesting boxes or containers. Remember, the tighter the 'seal' of your containers the more vital it is that you add sufficient air holes. When deciding what you want your wormery to look like it is well worth doing a quick image search online to research existing wormery designs of both home-made and commercial products.
I've seen a variety of different wormeries available, and they are mostly either two or three tier designs - though following the same principles. I decided that the additional expense of a third tier was so minimal, that I might as well construct a three tier wormery.
The basic design of a three tier wormery is to have a base, and two interchangeable composting levels. The top composting tier, when filled, becomes the middle tier, and when it does so the middle tier (which should contain compost by this point) is emptied out onto the garden and becomes the top tier. The top tier then has your vegetable (and other compost suitable materials) waste added into it until it eventually turns into compost and fills, at which point the process repeats.
Over time, and as the composting process is carried out, liquid composting by-products collect in the lower/base tier, from which they can be collected and used on your garden as a liquid fertiliser.
Plan Your Design
Before making your wormery you need to put together a coherent plan. Some people might be able to play it by ear and design something on the fly, but I always think it is worth spending a little time at the start to work out exactly what you're doing. This ensures you have all the right equipment to hand, can prevent you making an irreversible mistake, and can save time.
If the price of materials is a factor, and frankly for something like this it really ought to be, I advise to not have too rigid a design in mind until after you visit some shops and check out prices. Depending on special offers or your precise size requirements you may find containers/boxes quite suitable for the task that you hadn't initially considered.
I went to the shop looking for a great deal on individually sealable stackable boxes, and ended up buying garden planters instead.
Once you have your basic materials take some time to measure up your containers and draw yourself some blueprints to guide your process.
I'll describe the components of my wormery and the construction process below, but to start with here is a copy of my design blueprints. Note the drainage tap measured for fitting in the base, a means to raise the middle tier so it doesn't sit all the way into the base, and air holes for the middle and top tiers.
My design shows (right hand side) a front elevation of the base (see tap position) which includes air holes. After further consideration I omitted air holes from the base tier as being unnecessary. The positioning of air holes shown is the same as that ultimately used for the middle and top tiers.
Below: Take a look at my basic wormery design plans.

Construction Materials
In order to replicate my wormery design, you will need:
- some containers. I used black plastic square(ish) garden planters that measured
- 320mm long/wide (upper edges)
- 320mm high
- 250mm long/wide (lower edges)
- a tap (garden centres should sell replacement water-butt taps)
- a drill with both large and small drill bits
- smaller plant-pot or other object to place inside the base to raise the level at which the middle tier sits
- mesh material
- some sort of lid (if the containers don't come with one)
- newspaper (most of which should be shredded)
- water
- manure
- compostable food waste
- worms - of course
Preparatory Work
Fun with Drills and Sharp Blades
After planning precisely how your containers will fit together, work out where you need to place your air holes (middle and top tiers), and drill these will the smaller drill bit. you're aiming for a size through which the worms won't be able to easily escape. you will also need to drill worm holes in the base of the middle and top tiers (use the larger drill bit).
Below: These are the black plastic planters I used. This image shows two planters, showing what they look like before they are attacked with hole making devices.

These planters are fairly sturdy black plastic, and I was confident they would maintain rigidity with the number of holes I planned to drill.

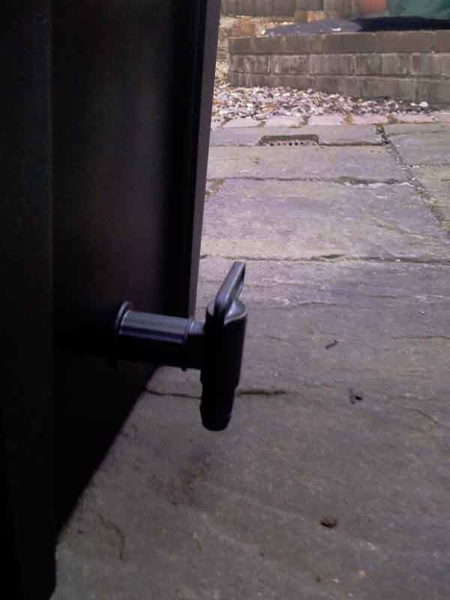
After identifying (randomly) which planter was to be my base, I measured and drew on the location of the tap hole, and used a sharp craft knife to carefully (do this very slowly to avoid error) cut out a round hole. The hole you cut should be a perfect circle with a diameter equal to the part of the tap that goes through the hole - yes, this is rocket science!
The height of my tap measured 80mm in height. The hole in the planter for the tap needs to be sufficiently far enough up from the bottom so that the planter can sit on a flat surface without interfering with the tap. My original plan indicated that I would place the tap 100mm from the floor level, though I revised this to be closer to 50mm. As I plan to place my wormery on the edge of a raised bed the tap will have sufficient gap beneath it for me to pour off into a bucket.
Please take into consideration how you will collect your 'worm juice' when planning the tap position. Note also that the higher your tap, the more worm juice your container needs to collect before you can pour any off. In a worst case scenario you can always detach your base tier to pour out 'worm juice' without needing a tap at all.

Above: tap has been fitted into a cut hole in the base tier.
Below: note that the tap is high enough so as not to interfere with the floor - useful if you like a stable wormery on a flat surface.
Below: This tier (middle or top) shows the three lines of air holes, and even shows the badly erased pencil marks that aced as guidelines (a little bit of water or natural weathering will clean these marks away). Your wormery is a functional device, but that's no reason that it shouldn't look nice. You can drill sufficient air holes randomly around the top, or you can measure each hole to the millimetre. Air holes should be small, and ideally the worms shouldn't be able to get through them.
Below: A close-up of middle/top tier air holes. Note that perfect measurement of air hole positioning is no guarantee that when it comes to drilling you'll get the holes spot on.

Below: Food waste is added to the top tier, and worms are supposed to be able to move freely between the top and middle tiers. This means, as they are interchangeable, that the top and middle tiers need to have holes in their bases to allow the free movement of worms. These holes are intended for worm travel, so the more the merrier. Note again the non-random placement of holes for purely aesthetic purposes.
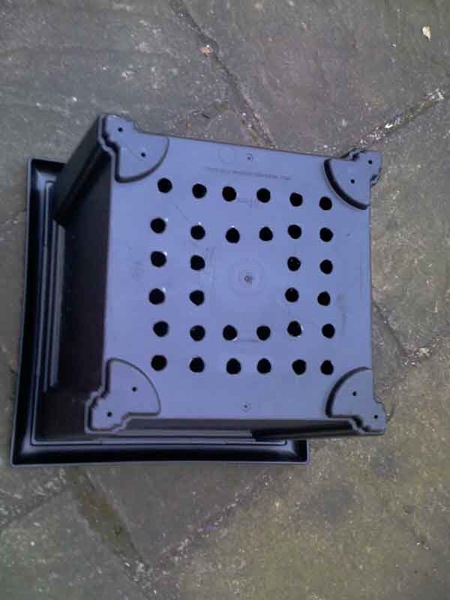
Drilling holes can leave plastic burrs on the inside of your containers. It is worth taking a moment with a craft knife to cut these away. We wouldn't want our worms injuring themselves on sharp edges!
Below: The base tier needs something inside it upon which the middle tier sits so as to keep it raised (at least if you are using nesting containers that would otherwise stack too tightly together). As this ceramic plant-pot was on sale for 99 pence it seemed like a bargain to both act as a support, and also to provide sufficient weight to the base to keep it stable.

Below: Compare the size of the ceramic plant-pot and the black plastic planter.

Below: As the middle tier will have holes in the base, I was worried about worms falling into the base tier. I made a 'net' out of some garden mesh to sit between the base and middle tiers to catch any worms that decide to go exploring in the wrong direction, this will hopefully stop them drowning in their own juices. Note: if this catches worms, they may be able to make their own way back into the middle planter, but it is worth checking, now and then, and rescuing any stranded worms.

Putting the Tiers Together
Bottom Up
It makes sense to build your wormery from the bottom, so I took the base tier and placed the up-turned plant-pot into it.
Below: Plant-pot inside the base tier.

Below: Plant-pot inside the base tier showing the inside of the tap fitting. Note that the circumference of the plant-pot rim sits snugly in the bottom of the planter. As I purchased these at the same time I was able to ensure that it would fit. The inner part of the tap fitting almost interferes with the plant-pot, so bear this in mind when factoring in the best position of the tap.

Next I placed my worm catching net into the base tier, sitting on top of the plant-pot. The net was easy to make by folding in the corners of a square piece of mesh and fastening the corners together with some sandwich bag ties.
Below: Showing the placement of the net inside the base tier.
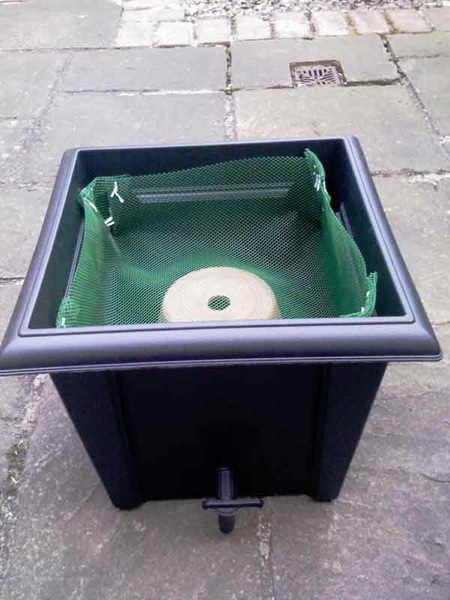
The next step is to place the middle tier to sit on top of the net. One way to ensure a good fit is to turn the middle tier upside down, fix the net over the base, and then place this down carefully into the base tier to sit on the up-turned plant-pot.
Below: Showing how the net, in the base tier, fits to the bottom of the middle tier.

Below: Placing the 'netted' middle tier into the base tier.

Below: Final fitting and placement of middle tier inside base tier.

Below: Note the air holes of the middle tier are clearly visible above the rim of the base tier.

Below: Proof that I have more than just the two tiers. Note the middle and top tiers are identical and fully interchangeable.

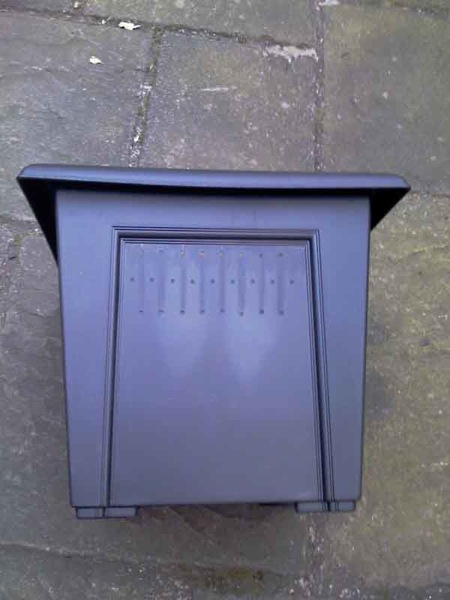
The wormery needs a lid, this should fit across the top of the top tier. I found this rubber outdoor mat on sale in the gardening section of a DIY shop. The pattern of squares on the top of the mat happens to fit flush with the rim of the planters (the inner 16 squares sit inside the rim, and the outer 20 squares sit outside the rim).
Below: This mat is quite heavy and so not only provides protection from rain and nosy birds, but also weight to aid stability.

Below: Showing how the 'lid' fits.

Wormery Takes Shape
Getting your hands dirty
Get all remaining materials together in one place, and get ready to dirty your hands.
Below: Here we see some water (in a watering can) and a local, free, unread newspaper.

Below: If making one wormery isn't awesome enough, I made two at the same time. I'm not greedy, one of these is for a friend. Making several wormeries at a time is a great way to spread the cost of materials.

Below: This is farmyard manure, if you hadn't realised. No extra points for working out which DIY shop I purchased most of my materials at.

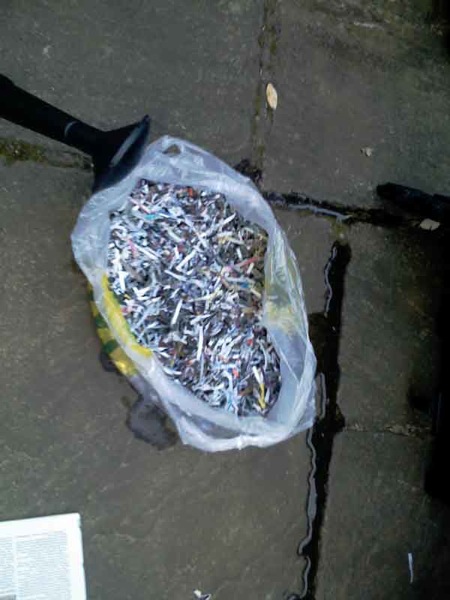
Below: Worms don't like to read, so most of the newspaper will need to be shredded. Here's a bag I made earlier.

Below: They may not look like it, but these are worms. I purchased these, 1kg per wormery, from a reputable online seller of worms.

Constructing the Wormery
Below: I took a few sheets of unshredded newspaper and tore them to fit inside the base of the middle tier.

Below: Using a watering can I poured on just enough water to wet the newspaper. This will cover over the large holes and (hopefully) prevent worms falling through from the middle to bottom tier.

Below: While I was watering-can crazy, I took the opportunity to pour water onto the shredded newspaper. It needs to about as wet as a half-drained sponge - a phrase that doesn't really mean much. Use enough water to wet all the paper, and if you use an old plastic bag with holes the excess water will drain away. This wet shredded newspaper is going to be a component of the worm bedding.
Below: This is a handful of farmyard manure, I did say we'd be getting our hands dirty.

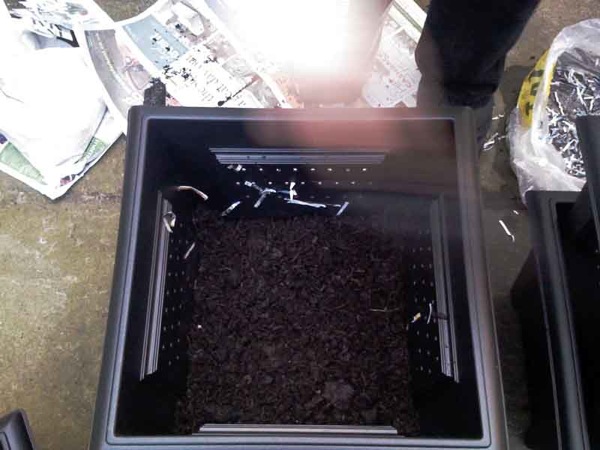
Below: Put manure into the middle tier until you are halfway up to the air holes. Make sure that the manure isn't compacted into lumps, loosen it in the bag with a trowel, or break it apart by hand when adding to your wormery.

Below: Then add wet shredded newspaper until you are almost, but not quite, up to the air holes.

Below: Mix the newspaper and manure together.

Below: You can't really do this properly without getting your hands in there and really mixing it up. This manure and wet shredded newspaper mix is the bedding material for your worms.

Below: Add a little more manure on top - you should not yet have reached the lowest level of air holes.
Below: Finally it is time to open up your bag of worms. For a wormery of the size shown here I used 1kg of worms.

Below: Carefully transfer your worms from the bag into the middle tier, on top of the wonderful worm bed that you've made.

Below: Extreme close-up of wriggling worms.

Below: Try to spread the worms out a little bit, they are squishy so be careful.

Below: Worms like the dark, so add a little more manure on top of them. You should now be up to the lowest level of air holes. Note that as we are about to put the top tier right on top of the middle tier, this extra layer of manure stops any potential worm crushing.

Below: Sprinkle a little water on top of the manure and worms, just to make sure they're moist. Not too much, we don't want to drown them!

Below:

Below: You might just about be able to see some of the worm bedding/manure through the holes of the top tier.

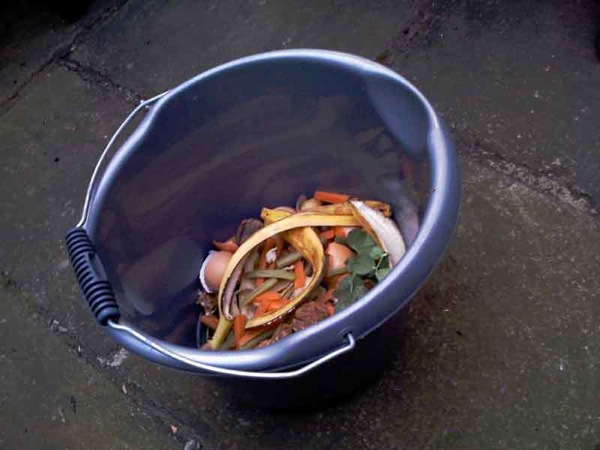
Below: This is a bucket of food scraps. Worms supposedly aren't too happy with citrus fruits nor the fleshy parts of onion and garlic. The picky eaters also prefer their food in small chunks. In addition avoid meat, fish, cheese, and rotting/mouldy food waste.
Below: Tip the food waste into the top tier. Keep adding food waste every few days. Over time this food waste will be turned into compost.

Below: Put the lid on.

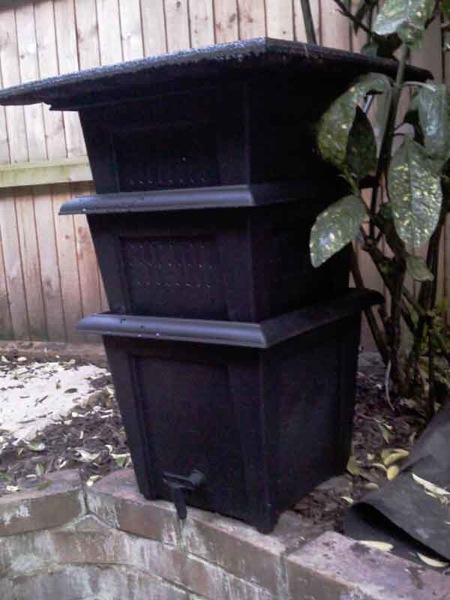
Below: Transfer to a sheltered part of the garden, out of direct sun, and where the wormery won't be tipped over by a strong gust of wind. I have contemplated drilling a hole in the rim of the base tier and using a cable-tie to secure to a sturdy stalk of the nearby shrub.
Final Thoughts
Cycling through top and middle tiers
When the top tier fills with compost the worms will have migrated up into the top tier. At this point empty the middle tier's contents onto your garden (keep an eye out for stow-away worms trying to escape, re-capture them add add them into the top tier). The top tier now becomes the middle tier, and the freshly emptied tier becomes the top tier.
Over time, and as the composting process is carried out, liquid composting by-products collect in the lower/base tier, from which they can be collected and used on your garden as a liquid fertiliser. This 'worm juice', as some call it, is quite concentrated and should be diluted with water at a ratio of approximately 1:10. Keep a close eye that this liquid doesn't fill up the base tier and soak into the middle tier. If liquids do not gather as quickly and in the quantities that you wish, or your tap position is too high to drain off the liquid, feel free to add your diluting water directly to the base tier from which you can then pour off liquid fertiliser that is ready for use on your garden.
Costing
The following are the prices for the materials I used to construct one wormery.
- 3 planters £10.00
- Ceramic plant-pot £0.99
- Tap £3.98
- Green mesh £0.95
- Rubber tile/mat £5.99
- Farmyard manure £1.50 (1/4 of a bag that cost £5.99)
- 1kg worms + postage £23.50
- TOTAL £46.91
Note that you can save quite a bit on materials by reusing materials that you may have around the house. It's also a good idea to club together with friends to purchase worms as they are cheaper per gram in larger quantities, and you can split shipping charges.
Recovering Costs
The worms will supposedly double their number in 2 months, given sufficient room, and will maintain a suitable population level for their accommodation. If you have several friends wanting to make a wormery, and some of them are prepared to wait a few months, you can share half your worms with a friend for suitable financial repayment. In theory from 2 kg of worms and sufficient patience (2 months), 4 friends could each get 1kg of worms for approx £10. Alternatively you could sell half your worms on ebay every few months.
Friday, 24 October 2008
Religion and Politics
By the way, Amy said yesterday (she actually spoke these words within hearing distance of me, so don't scan down the page thinking you missed her 'blogging this comment) that a 'blog shouldn't contain views on religion or politics, as she didn't want readers offended. (Amy says: I actually had three things on my list. Politics, religion, and sex. Thank goodness he only talked about the first two, I suppose!)
Do you know how sorely tempted I am to now post about religion or politics? Especially as I have such strong views that will no doubt offend the majority of readers!!
Of course, that would take my valuable time, and require me to actually post to the 'blog, which is something you all know I don't do.
So, do me a favour.
Delve into your deepest beliefs about religion and politics...
... take a moment to clarify in your mind the exact nature of your beliefs and opinions...
... add them all together into a single entity that uniquely defines you...
Now, (to be fair, probably all of you) realise you are totally wrong. Your beliefs are ridiculous. Your opinions laughable and self-contradictory. There are fundamental facts and clear irrefutable evidence that prove that what you think is right, is actually wrong. The very core of your life up to this point that has been influenced by these thoughts should be carefully gathered up, taken out back, and humanely put down like an old blind sheepdog. You need to reassess your beliefs or opinions, and this could well take you the rest of your short life to do so. Even then you might never get it right.
But, I'm a caring person. I don't want the rest of your life to be the waste that your life up to this point has been. You've done me a favour, saved me the time by gathering up your own beliefs and destroying them to save me the effort, so I am going to save you time also. You don't have to spend the rest of your life fighting to work out the truth. I'm going to let you share my thoughts and beliefs instead. If anyone asks your opinion, just say you agree with Stephen.
There you go, don't you feel better now, knowing you're finally right?
Tweets - Our aggregated Twitter feeds
The observant regular reader may have noticed that there is a new 'block' on the right-hand side of this 'blog labelled Tweets.
For those curious as to what this is, let me explain.
I recently attended a 'Handheld Learning' conference where I was persuaded (against my better judgement) to get a Twitter account. Twitter is a micro-blogging service with multiple input channels, designed specifically to allow mini updates to be submitted. Twitter has a 140 character limit on each update, that phone text/sms messages are often limited to 140 characters is not a coincidence - Twitter updates can be submitted via sms, the twitter website, as well as a variety of other 3rd party applications.
As I generally don't spend much time writing to my 'blogs (I have four that I regularly don't use), I never really saw the point of having a micro-blog to ignore also. However I was pleasantly surprised, a micro-blog does not serve the same function as a 'blog, and is actually far better suited to the needs of those of us who don't have the time (or are too lazy) to 'blog 'properly'.
The 'rules' of micro-blogging are also significantly different. There isn't the space for a lengthy meandering trail of ones inner thoughts and angst. No time for long deep, dark, poetry that truly reveals the value of one's inner soul as having more merit than the cruel word gives it credit*. Instead a twitter update is supposed to be a short, punchy, to-the-point response to the question "What are you doing?"
Yes, there may be a tendancy to update too much on what one is thinking as opposed to actively doing, but as space is limited, you the reader don't have to put up with too much inner reflection - phew!
Also, if one 'follows' other twitter users (I follow several that work in a similar field to my own), you get some insight into what they are up to, a nice way to keep up with colleagues, friends, or even the awesome Stephen Fry**.
Right, so I've told you what Twitter is, but there's still that thing on the right that may need explaining. Amy, Ashley, and myself now have Twitter accounts. Amy thought it would be a good idea to import the latest 5 updates from each of us to display on the 'blog. Amy found some code that did it, and she pasted it into the site, all well and good. I decided however that it wasn't good enough. I wanted to take the three individual and separate twitter feeds and merge them into a single list. I wanted to have them appear in true mixed reverse date order rather than sorted by author before date. It wasn't too difficult to do, at least not at first. It worked in Firefox, then I found it didn't work in IE. I fixed it for IE, then it didn't work in Safari. Then I fixed it in Safari and one of our regular readers DARED tell me it didn't work in IE or Firefox for them. I checked, it does work, it works for me. If you the reader are having any problems, it's either the fault of your computer, or your eyes.
So, to summarise, the Tweets 'block' on the left contains the latest 15 Twitter updates from Amy, Ashley, and myself (5 each). There's a chance we might actually Twitter more than 5 times in a day, so if you don't want to miss out on our 140 character comments on the nature of existance, the taste of our dinner, or the colour of the sky, you'll have to visit this 'blog several times a day.
*You know that the cruel world is right, don't you? You don't have a soul. That thing you think is a soul is just your inner voice that's too terrified to realise that the universe is a huge place and your role within it is insignificant. So your poetry is ultimately futile, and your time spent writing it wasted. That time spent can not be recovered, you pointlessly wrote yourself closer to death. Deal with it!
**If you don't know who he is, you should be ashamed of yourself!
Thursday, 10 July 2008
The Job Interview
Today I had a job interview. There were 4, possibly 5 other people being interviewed. The job, and the interview were in London.
I had to give a 5 minute presentation, which was almost perfectly timed. The interviewers were running late, so I had the chance to have a meet and greet with some of the team that I would be working with before hand. The actual interview itself went ok. I could have been better, but it could have been worse.
I won't know anything until next week, as there is one person who is not actually interviewing until then.
I feel ambivalently about the whole thing. I'll wait and see what happens.
Friday, 4 July 2008
4th of July - British Style
Happy 4th of July.
British style means.... nothing.
No fireworks, no comments, nothing.
Stephen asked me last night if it made me sad to be missing July 4th, and I honestly had to say yes. Part of me wanted, once upon a time and even now and again, to not be an American. There are times when I am ashamed of my country and what we are doing in the world and to it. But I still love my country. I love it even when I am ashamed. I will never stop loving my country. It is a fundamental part of who I am. I am shaped by being American, and I am sad to not celebrate its becoming. I don't want to not be American. I just want being American to mean more than egocentricity and money. I want being American to mean something good not only to me, but in the eyes of the world.
So Happy 4th of July, friends and family. My heart is with you even though my body is not.
Friday, 22 February 2008
And this is what I am talking about.
Americans are prudes... and here are some TV commercials that prove it. These are the kind of adverts that can make Amy blush.
To see more of the adverts we see, go to http://www.tellyads.com/2007_top_20.php
Tuesday, 21 August 2007
Gila
 Today we went to Gila national park. We hiked several miles through a lovely canyon cut into some pretty rocks by a still vigorously flowing river.
We got to see a woodpecker, a squirrel, many spiders, lizards, huge bumble bees, some fish, and even a few other hikers.
In addition we got our feet wet, padding in the almost freezing river water to cool our feet down from the walking.
Afterwards we stopped off at a picnic spot overlooking Gila park and consumed a quick sandwich.
